Thursday 27 December 2012

Storyboard

My group and I drew up our storyboard to give us a visual idea on how our final product will look. It helped us analyse whether or not we had included all the relevant information such as the transitions, type of shots and timing and this would go on to help us create our anamatic presentation. It has also helped us prepare for our filming and ensure we don't make too many mistakes.


This is the first storyboard my group made and it gave us our first visual representation of what our final product would look like. After having done this, we found that some of our shots were either too short or long so they had to be adapted and we needed to add a lot more detail overall. This meant that we needed to include where our titles would be found and what transitions we were using as this would help us in the future when we start editing. 


This is our second storyboard and as you can see there are a few developments. We've added and changed a few things and had to think carefully about each shot. We had included a variety of different camera shots but not enough camera angles. Therefore, we had to think very carefully about the different angles of each  shot to ensure we had included a variety.


Overall, creating the storyboard has been successful because it has allowed us to form a visual representation of what our final product will look like. This has enabled us to prepare for our filming and editing as it has provided us with a guide. Furthermore, it will help us create our anamatic presentation which will help us with our overall development of our ideas. 

Monday 17 December 2012

Continuity Task: First Cut

This is the first cut of our continuity editing task that we have planned, filmed and edited.


The software we used was Adobe Premier Pro. I was fairly new to this software and had only used it once before in our recreation task. However, this experience has provided me with a enough knowledge to be able to use basic techniques within the software which will help me when it comes to editing our final product. This is useful becasue as a group although we all have our individual tasks I will want to make sure I can help and edit our product myself to ensure we share the workload equally.


Our only main problem with our first cut is the non-diegetic sound. We were ruhed into choosing our non-diegetic sound and this caused us to pick a piece of music that doesn't entirely fit with our narrative. We felt it was to dramatic and therefore, we have decided that we will change it to something that more subtle that can simply play in the background rather than take over the whole video. But, becasue we have made this mistake now, we will be able to learn and ensure we don't make the same mistake in the future when we are editing our final product.

On the other hand, we have managed to include all the technical requirements which provides us with an all round technical knowledge in preparation for planning, filming and editing our final product.

Wednesday 12 December 2012

Shotlist

Below is the shot list for our final product.

  • Long shot of the back of our protagonist facing a window
  • Close up of a bottle of alcohol and a glass, and our protagonist pouring liquid out of the bottle into the glass
  • Medium shot, the camera tracks round to a side view of the protagonist
  • Close up of the protagonist's face, as bring the glass towards her mouth
  • Extreme close up of protagonist drinking the drink
  • Extreme close up of the protagonist's eyes
  • Fade to a white screen
  • Fade to extreme close up of teachers eyes
  • Low angle, point of view shot of teacher telling the protagonist that her brother has gone missing
  • Fade to white screen
  • Close up of protagonist looking frustrated/ upset
  • Blurry/slightly out of focus point of view shot from the protagonist as she walks over to the desk
  • Medium shot of protagonist sat at the desk
  • Close ups/ Extreme close ups of the protagonists hands circling/underling words in articles, photographs, finishing drawings etc.
  • Cut to the title centralised on the screen
  • Long shot of the antagonist walking down some stairs
  • Medium shot of antagonist looking at his reflection in a mirror.

Tuesday 11 December 2012

Possible Locations

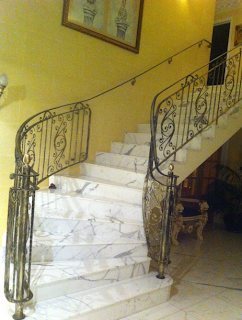
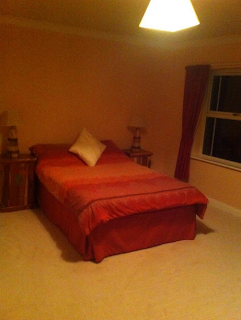
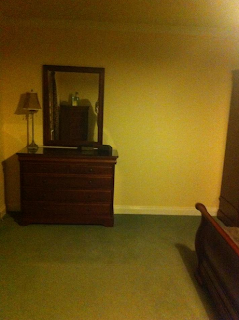
When it comes to filming our final product it is definitely important to find a good location to film that ensures our setting was appropriate for our narrative. The first and main location we will have to consider is the simplistic room that our protagonist will be filmed in. Ideally we would like a basic room, with no electronics or decorations in order to make the room look isolated representing how our protagonist will be feeling. We have found two rooms which are fairly similar because they are both plain but have different colour schemes and layout therefore, we will need to make a decision on which one would be more appropriate. We are going to be representing our antagonist to be wealthy character and of higher class compared to our protagonist. Therefore, we thought a marble staircase and large mirror will emphasise his  social status. 


Continuity Editing Task: Filming

The next stage of our continuity editing task was to film it using our storyboard to guide us. 

Problems we faced

The first problem we faced was the fact that our storyboard wasn't detailed enough which meant that we ended up having to add in and film extra shots which we had missed when drawing it. Therefore we have learnt that when it comes to drawing our storyboard for our final piece we should ensure that its much more detailed and we should consider briefly trying out a couple of shots to see if they will work and be successful. 

Next, one of the props we had planned to use when planning the task had to be changed when it came to filming because it wasn't practical or possible to use. We planned to have our protagonist look through a pile of paper, however, when it came to filming we discovered this would not be possible because every time our actress attempted to do this, the stack of papers fell over. Therefore, to overcome this problem we decided to use a stack of paper trays instead. This worked well because it provided the same effect and was much more practical. 

Finally, our narrative turned out to be slightly too simple which restricted our technicality. Therefore, we adapted it to add a bit of complexity to the narrative and allowed us to showcase a wider variety of technical skill which we would have been unable to do if we'd not made any changes. 

What we think went well

Firstly, we made sure we started filming as soon as possible after planning and creating our storyboard. This then gave us plenty of time to edit our product. We also managed to include all the technical requirements to do with camera work whilst filming such as not breaking the 180 degree rule, and including a shot/reverse. Finally, we have gained knowledge and experience about filming which will help us all when we start filming for our final product. 

Evaluation

I have learnt many things from this experience, firstly, my group and I will need to ensure our storyboard for our final piece is much more detailed to provide a strong base and starting point for when we start filming. As well as this, it will give us a detailed guide that we will be able to follow when we're filming. We will also have to ensure our ideas are practical and that we use appropriate props within our final product. We should also make sure we continue to manage our time well as a group to ensure we stay organised and on top of our work in order to meet deadlines.

Storyboarding Practise

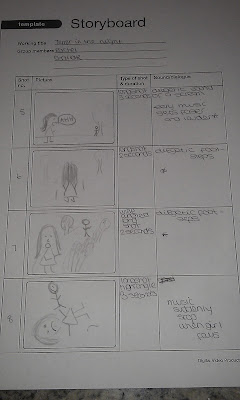
We have been practising our storyboarding techniques in order to prepare for starting our storyboard for our final piece. For this exercise in pairs we had to create a storyboard for a small extract from a scene from a horror film called 'Terror in the night'. We had to include the genre horror, a chase scene and a man and a woman. We then had to think about a range of things including:

  • Transitions: shot lengths/style/speed of transitions.
  • Mise-en-scene representing the genre
  • Technical codes to show gender superiority/ weakness
  • Sound including a sound bridge
  • Camera: Angle/framing/ movement.
This is what my partner and I created. 


After creating our storyboard we were told we'd have to pitch our idea to one of our teachers which meant trying to prove our movie would be worth investing in hypothetically. 

In addition, we were given the opportunity to listen and learn from a professional storyboarder and animator who gave us some top tips for when we have to draw a storyboard. For example, she taught us that instead of drawing the storyboard in the correct order, it can sometimes be easier to draw random, key ideas first in order to to get some ideas on to paper. Furthermore, we were also taught the rule of thirds, where a grid of 9 squares is drawn over the frame. This allows you to take time over thinking about where you should place items and characters within the frame because anything placed in the center of the frame is supposedly more noticeable to an audience. 

This has been very useful in adding to my knowledge and understanding of storyboarding because I will be able to use these techniques to help me when drawing a storyboard in the future. In addition, it has given me some practice on how to storyboard which means if I come across any mistakes I will be able to learn from them in order to progress. 

Thursday 6 December 2012

Continuity Editing Task: Planning

We have been given the task of creating a piece approximately 60 seconds in length. It shouldn't exceed 90 seconds and had a few technical requirements we had to think about:
  • You must not break the 180 degrees rule
  • You must include a shot - reverse- shot
  • You must include a variety of appropriate camera angles 
  • You must edit so the continuity is apparent and meaning is clear
  • You must include more than one location
  • You must include some interaction between characters
  • You must include some non-diegetic sound
The first thing my group decided was to create a short narrative, this simply consisted of a person walking into a room looking through a pile of papers, stealing a mark scheme to a test, and having teacher walk in and surprise them. We didn't want anything too complicated and we didn't want to waste time over it because we felt that our time would be better spent on creating the storyboard for the task. This worked well because it meant we had more time to consider and carefully think about which camera shots and angles we felt would be appropriate for our narrative to use within our piece. Our storyboard is below and once we had created it, it was then time to start thinking about when we would start filming.